Creating a Flat Price Sale
Introduction
This guide will walk you through the process of creating a token sale on AlphPad using the React-based frontend interface.
Important Note: All sale settings are final upon creation, with the exception of the whitelist. However, the whitelist merkle root can be updated until the sale start date.
Steps to Create a Sale
Accessing the Sale Creation Page
Navigate to the "Create a Sale" section on the AlphPad Launchpad.
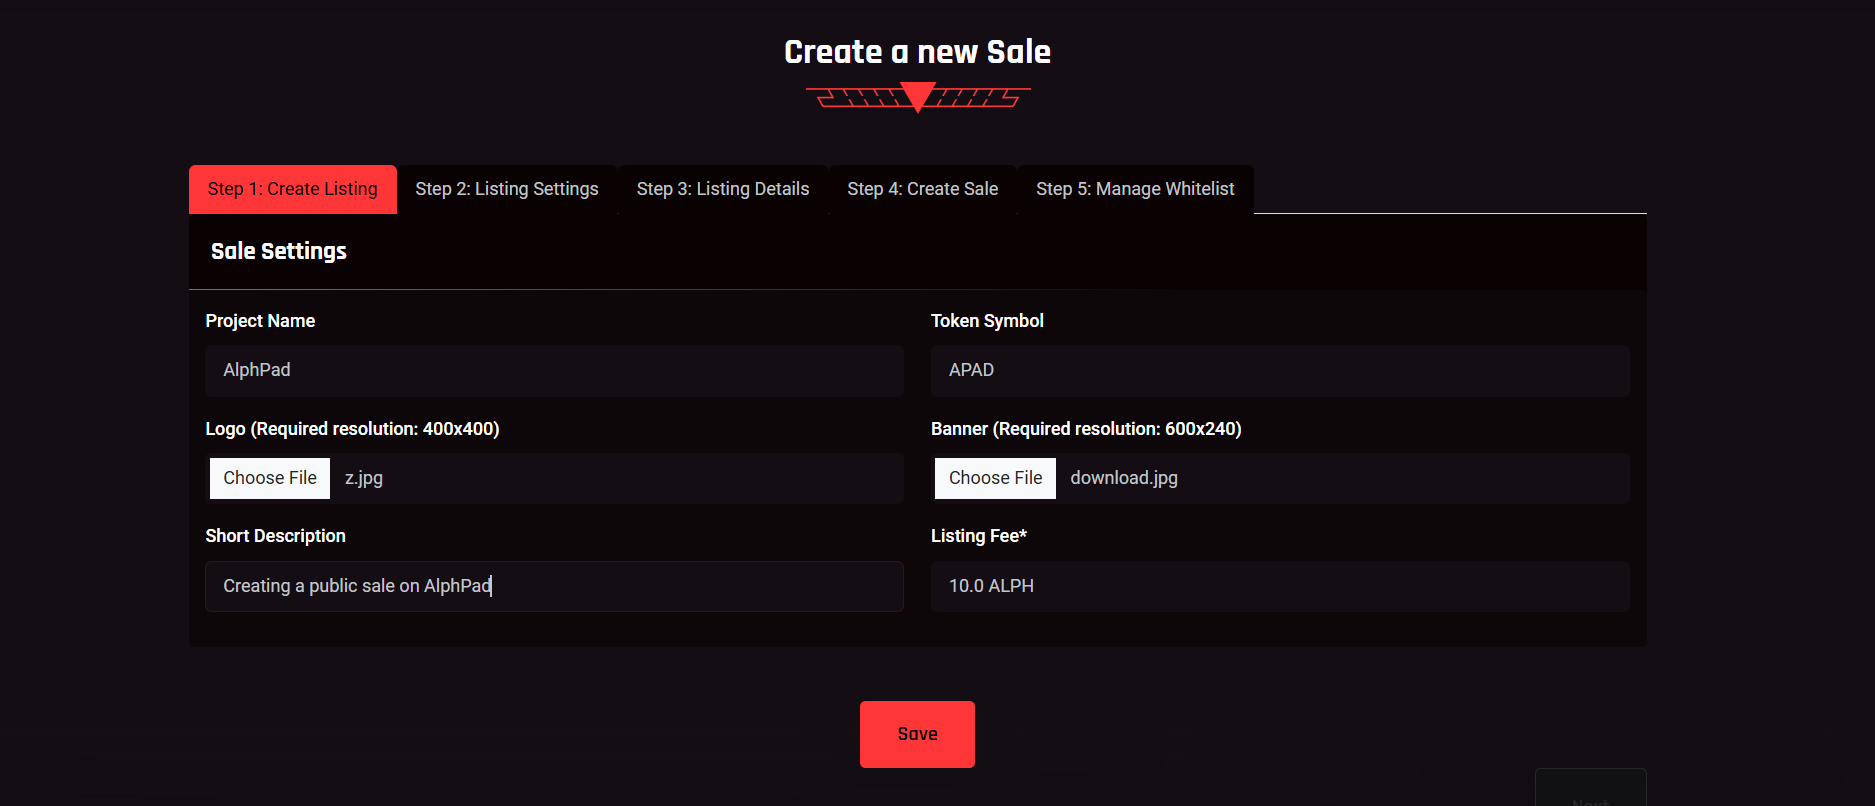
Step 1: Create Listing
- Project Name: Input the name of your project.
- Token Symbol: Input the symbol for your token.
- Logo: Upload the logo for your project. Ensure the logo image is in a 400x400 pixel resolution for optimal display.
- Banner: Upload a banner image for your project. The required dimensions are 600x240 pixels.
- Short Description: Write a short description of your project. This should briefly explain the purpose of your project and what makes it unique and valuable.
- Listing Fee: A fixed listing fee of 10 ALPH is required.
- Save & Next: Click save, sign the transaction, then click Next.

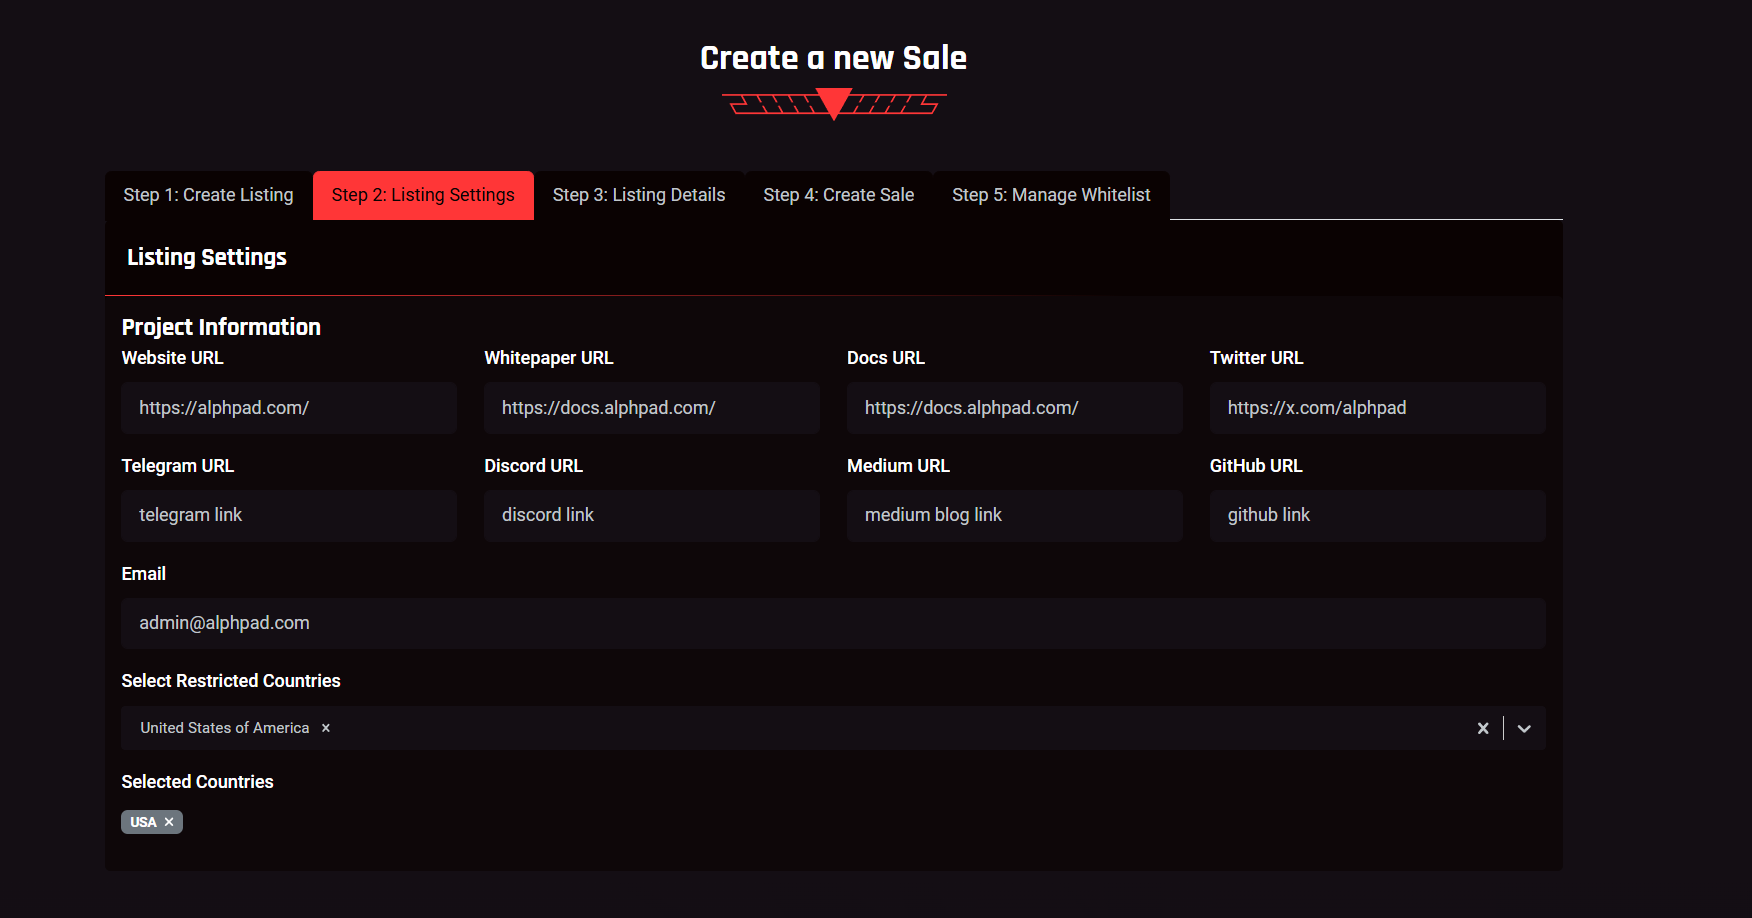
Step 2: Listing Settings
- Website URL: Enter the official website URL for your project. This link will be visible on the listing page.
- Whitepaper URL: Provide a link to your project’s whitepaper. Ensure that the document clearly outlines your project's goals, tokenomics, and technical details.
- Docs URL: Add a link to any additional documentation that may help users understand your project, such as technical or developer guides.
- Twitter URL: Input your project’s official Twitter account link.
- Telegram URL: Enter the link to your project's Telegram group or channel.
- Discord URL: Provide a link to your project’s Discord server.
- Medium URL: Include a link to your Medium account or blog where users can find articles or updates about your project.
- GitHub URL: Add the link to your GitHub repository, showcasing your project’s code or technical resources.
- Email: Provide a contact email for the project. This will be used for official communication and should be an actively monitored address.
- Restricted Countries: Select any countries where participation in the sale is restricted. This is a mandatory field to ensure compliance with regional regulations.
- Save & Next: After filling in the required fields, click save, then click Next.

Step 3: Listing Details
- About: Provide a detailed description of your project. This section should explain the project's purpose, vision, and what makes it unique. Use this space to capture the interest of potential investors and community members.
- Token: Describe the tokenomics of your project. Include details such as the total supply, utility, distribution plan, and any other relevant information about the token.
- Roadmap: Outline the project roadmap. Highlight key milestones, development phases, and future goals. This section helps users understand the long-term vision and planning of your project.
- Team: Introduce the core team members behind the project. Include their names, roles, and relevant experience or background. This information helps build trust and credibility with the community.
- Save & Next: Once all fields are completed, click save, then click Next.
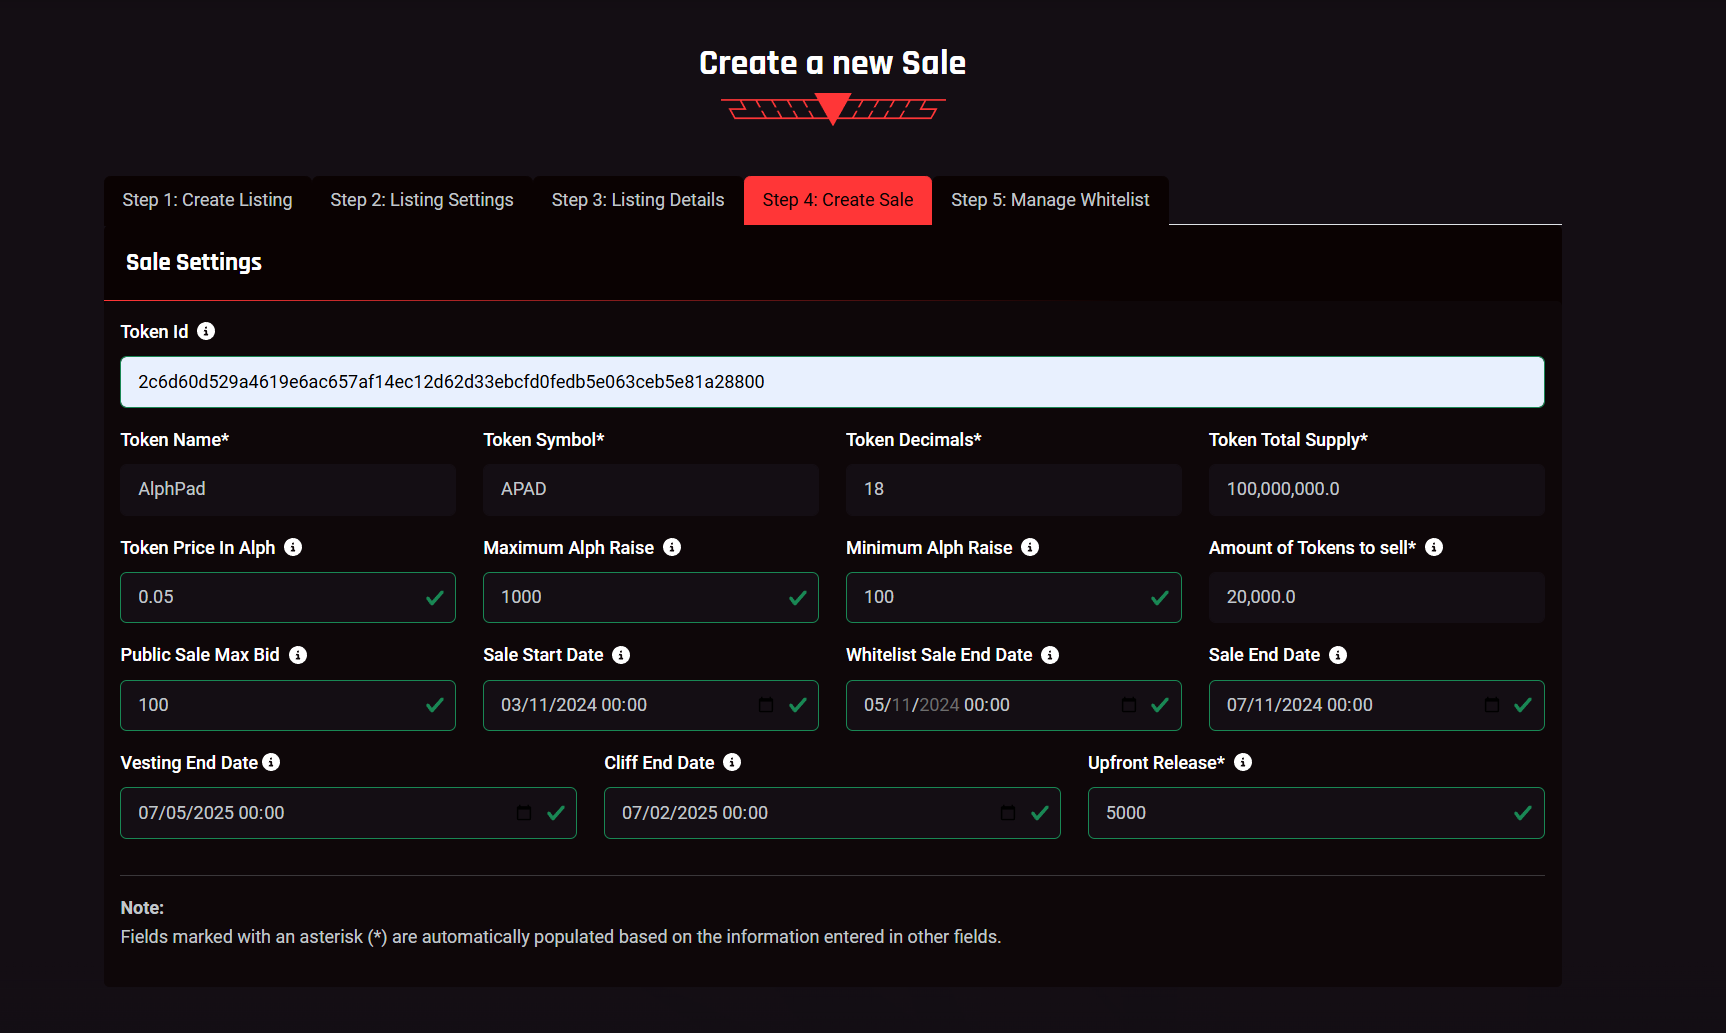
Step 4: Create Sale
- Token ID: Input the unique token ID. The rest of the token information will be fetched automatically from the blockchain.
- Token Price in ALPH: Set the token price for the sale.
- Minimum ALPH Raised: Define the minimum goal in ALPH that must be reached for the sale to be successful.
- Maximum ALPH Raised: Specify the maximum ALPH value of tokens you aim to raise.
- Public Sale Max Bid: Set the maximum amount of ALPH that can be purchased per address during the public sale.
- Sale Start Date: Choose the date when the sale will begin.
- Whitelist Sale End Date: Set the date when the whitelist sale will end.
- Sale Ends Date: Specify when the entire sale (public + whitelist) will conclude. If there is no public sale, set the Sale Ends Date to match the Whitelist Sale End Date.
- Vesting End Date: Set the date when the vesting period should end. If no vesting is needed, keep this the same as the Sale Ends Date.
- Cliff End Date: Define the cliff period end date. If no cliff is required, set this to be the same as the Vesting/Sale Ends Date.
- Upfront Release: Indicate the percentage of tokens to be released upfront in cases of vesting and cliff, in basis points
- Save & Next: After completing all inputs, click save, sign the transaction, then click Next.

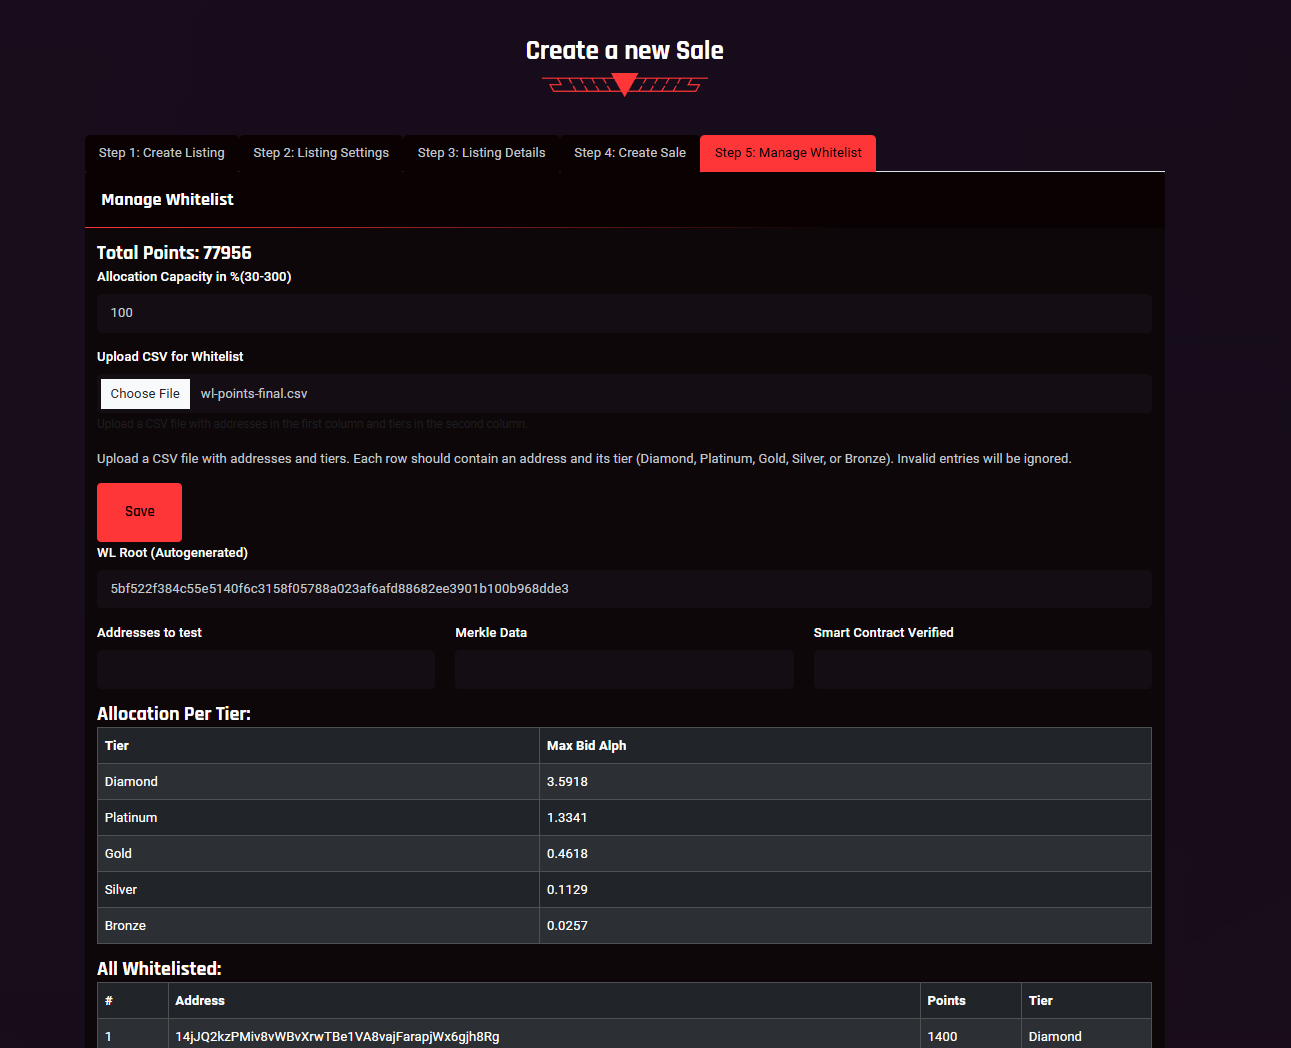
Step 5: Manage Whitelist
- Allocation Capacity: Input the percentage of how much each address can allocate to the sale. For example, if you want to overprovision, you can set this to 120, allowing each address to buy 20% more. Note: Overprovisioning means there might not be enough tokens for all participants if high participation is expected.
- Upload CSV for Whitelist: Add a .csv file with two columns: Address and Tier. When the file is uploaded, a popup checker will appear. Review the list, then scroll to the bottom and click Import. A WL Root will be autogenerated.
- Addresses to test: Check some of the added addresses in this input and under Smart Contract Verified it should return true.
- Save: When all settings are configured, click save, sign the transaction, and your sale will be created.

Need Help?
If you need assistance or have questions, feel free to reach out to our team on Telegram or Discord (links available in the website footer).